Wednesday, February 28, 2018

{Macro Friendly Chicken Pot Pie}

{Macro Friendly Chicken Pot Pie}


Hello cupcakes!

Who likes Chicken Pot Pie? I have a healthier version to share with you. 

The Macros for 1/7 of the recipe:
259 calories, 5.1 g fat, 18.2 g carbs, & 34.6 g protein

Here's what you need for the filling:
1-1/2 lb of cooked chicken breast, shredded
1 cup of almond milk
salt & pepper to taste
1 cup of chicken broth
1 pkg. of frozen beans (mine had 4 servings in the bag)
1 pkg. of frozen mixed vegetables (again, 4 servings per bag)

Here's what you need for the "biscuit" part:
1 cup of almond milk
1 egg
1/4 tsp onion powder
1/4 tsp garlic powder


Directions

-Preheat oven to 350 degrees and grease an 8X8 pan
-I cooked my chicken in a skillet and then saved the juices for the gravy
-In the skillet, add 2 T of arrowroot flour, 1 cup of almond milk, 1 cup of chicken broth, salt, and pepper
-Continue to stir the gravy and add more arrowroot flour as needed to make the gravy
-Once the gravy is thickened, add the shredded chicken to the gravy & stir to combine
-Next, stir in the frozen veggies and cook until the veggies are no longer frozen
-Scoop the filling mixture into the greased pan
-Next, make the biscuits in a separate bowl
-Add all of the biscuit ingredients to the bowl and stir to combine
-Add the biscuit batter to the top of the filling in an even layer
-Place the pan in the oven and cook for 15-20 minutes or until the biscuit layer is finished cooking
-Store the leftovers in the refrigerator

Yields: 7 servings


I prepped this during the weekend and I will be having it all week!


ENJOY!


Later Taters

"It's a beautiful day, don't let it get away." 

Monday, February 26, 2018

{Aloha Protein}


Hello cupcakes!

I had the opportunity to try out some Aloha Protein and I want to share my honest review with you!


GUYS... I am obsessing over this bar! The flavor is amazing and I am totally in love with the little chocolate chips that are throughout the bar. It's all plant based, so it's vegan friendly. The bar is also dairy free, gluten free, soy free, and non-GMO. Here are my ratings:

Taste: 10/10
Texture: 10/10
Price: 6/10
 *$30 for 12 bars, $2.50 per bar*
Ingredients: 9/10
Macros: 8/10
*14 g fat, 20 g carbs, 14 g protein*
It has a pretty good balance of fats, proteins, and carbs & a super good snack to keep you full between meals. 


Now for the protein...

I was able to try the vanilla, chocolate, and banana protein powder. They are all gluten free, vegan, dairy free, soy free, contain no stevia, and nothing artificial. 


Taste: 6/10
Texture: 6/10
Price: 6/10
Ingredients: 8/10
Macros: 7/10 
4 g fat, 10 g carbs, 18 g protein

Notes: 
I made the recipe below using the vanilla protein. Cost is $30 for 15 servings, $2 per serving. Here is an example of the protein powder ingredients specifically for the vanilla protein powder:

Protein Blend* (Pea Protein*, Pumpkin Seed Protein*, Hemp Seed Protein*), Coconut Water Powder*, Coconut Cream*, Coconut Sugar*, Vanilla Bean*, Apple Juice Powder*, Madagascar Cinnamon*, Xanthan Gum, Pink Sea Salt, Sunflower Lecithin*, Monk Fruit Extrac

* Organic, Contains: Coconut"

Taste: 
Texture: 
Price: 6/10
 Ingredients: 8/10
Macros: 7/10
4.5 g fat, 10 g carbs, 18 g protein
*I have not tried this flavor yet, but I plan to try it this week & I will update this section*


Taste: 8/10
Texture: 7/10
Price: 6/10
 Ingredients: 8/10
Macros: 7/10
2 g fat, 13 g carbs, 18 g protein

Notes:
I mixed one serving with 12 oz water & used a packet to create the recipe below. The protein shake I made was a little gritty. The cost is $30 for 15 servings, $2 per serving. The ingredients only scored an 8 because there are a little too many carbs for my liking, but I understand where the carbs came from and why they are in there.  UPDATE: let the protein powder mixed with water sit in the refrigerator for at least 3 hours and the flavor and texture improve! I would rate this flavor 8/10 when it sits for awhile. 

Overall, I like this protein powder since it is natural. I usually prefer protein powder with less carbs since I am counting my macros at the moment, but if my macros allowed I would totally fit this in for the day. It can be a great protein powder to travel with since you get some fats, proteins, and carbs. I like that there are 18 grams of protein. The cost is a little expensive for my preference, but if you are interested in getting a protein powder that is all natural & you have a food intolerance, allergy, or dietary preferences this could be a good option for you!


Now for my fun & macro friendly recipe...

DIY Protein Bites


Ingredients
90 grams of ground pepitas
1 serving of Aloha Banana Protein Powder
1 serving of Aloha Vanilla Protein Powder
1 T of Anthony's Goods Peanut Flour
2 T Anthony's Goods Chia Seeds
1 scoop of Vital Proteins Beef Gelatin
1/4 cup of lite maple syrup or other liquid sweetener
1 banana
2 T of chocolate chips

Yields: 12 bites
Macros per bite: 10 g. fat, 10 g. carbs, 7 g. protein

Directions
In a food processor, add all ingredients except chocolate chips. Process until all the ingredients are mixed together and a dough forms. Next, stir in the chocolate chips. Add the batter to a mini muffin pan and pack the dough down. Once all of the mini muffin areas are filled, place the pan in the refrigerator to set. Allow the protein bites to harden for about 1 hour. Store the leftovers in the refrigerator. 

ENJOY!

"It's a beautiful day, don't let it get away." 



Thursday, February 22, 2018

{Naked Nutrition Review}

Hello cupcakes!

Today I want to share an honest review of Naked Nutrition. I will be reviewing 2 products: Naked Pea Protein & Naked BCAAs.


"Naked BCAAs are the highest pharmaceutical grade, fastest dissolving, and rapidly absorbed Branch Chain Amino Acids available. Studies have shown that BCAA supplementation improves strength and muscle development, speeds recovery, and increases endurance for men and women at all fitness levels.**"~ Taken from Naked Nutrition's website

Here are some details about the BCAAs-
-There are no artificial sweeteners, flavors, or colors
-Vegan, soy free, gluten free, and GMO free
-Includes L-Leucine, L-Isoleucine, & L-Valine (3 branch chain amino acids or BCAAs)

Other ingredients: 
Natural flavors, sugar, sea salt, citric acid, sunflower lecithin, and fruit & vegetable juice (for color)

L-Leucine 2500 mg
L-Isoleucine 1250 mg
L-Valine 250 mg

Macros: 
35 calories, 0 g fat, 6 g carbs, & 5 g protein

Price: $34.99
Servings per container: 50
Affordability: 8.5/10
Taste: 9/10
Stir ability: 9/10

My thoughts-
I actually am loving this product. I have a 40 oz travel tumbler and I fill it up every morning for my 1 hour drive to work. I will add 1 scoop of the Naked BCAA's and a few drops of water flavoring. I drink the whole 40 oz during that hour. Once I get to work, I eat my breakfast. I feel like the Naked BCAAs help hydrate me and fuel my muscles since I wait to eat until I get to work. The flavor also helps me drink more water. This is why I gave the flavor a 9/10 & it does not taste artificial like some brands I have tried in the past. The powder stirs into my water very well. I am a little hesitant with the serving size per container. I use the scoop that came with the powder, and I don't know if there are truly 100 servings. I think I should measure the 5 grams out of the powder instead of using the scoop if I want to get the most servings out of the container. If you truly get 50 servings for $35 that's only 69 cents per serving which I feel is a good deal. I would totally buy these in the future if my budget allows. I want to mention here, supplements are just that! They are supplemental to your diet and fitness. They are not needed, but can help aid in your progress/recovery. 


"Yellow pea protein powder is an excellent source of dietary protein for vegetarians and vegans that cannot use animal / milk based proteins."~ taken from Naked Nutrition's website

Here are some details about the Pea Protein-
-Gluten free, dairy free, vegan, and soy free
-No artificial sweeteners, flavors, or colors
-27 grams of protein per serving
-only ingredient is yellow pea protein 

Price: $54.99
Servings per container: 76
Affordability: 9/10
Taste by itself: 5/10
Stir ability: 7/10
Texture: 7/10
Adaptability for recipes, etc: 8/10

My thoughts-
I am not a huge fan of the flavor or texture of the pea protein. I have found that if I create recipes with it, then I can consume it. For example, this past weekend I made a pizza crust using pea protein and it was actually really good! Naked Nutrition also have a gluten free pizza crust recipe. Personally, I would not buy this protein to consume as a shake, but rather to bake with or make smoothies with because it covers up the natural flavor of the peas. I do appreciate that it is dairy-free and easy to digest. I also appreciate that there are no added fillers or sweeteners for people who do not want to consume those things. The price per serving is only 72 cents. 

Overall thoughts-
I love the idea of "Naked" supplements because many supplements on the market are not worried about the fillers and chemicals in their products. Props to you Naked Nutrition! The company advertises that they offer free shipping on all orders, so that is also a plus! I absolutely love their BCAA's and I am hoping to try more of their products soon. 

Later Taters

"It's a beautiful day, don't let it get away." 


Tuesday, February 13, 2018

Week 1 Avatar Nutrition Meal Plan + Avatar Nutrition App Review

Hello cupcakes,

I have officially started Avatar Nutrition back up!


I have started a slow fat loss stage and these are my current macros: 120 g protein, 136 g carbs, 49 g fat. My goal is to do a slow/moderate cut for 12-16 weeks or until I feel comfortable switching to a slow reverse. 

***Everyone has different macro needs, so please do not use mine. This is just to give you an example and show you my personal progress. I highly recommend signing up for Avatar Nutrition yourself so that it will be tailored to your specific needs. Read more about my Avatar Nutrition experience here. ***

My previous experience with my cut:


You can read this story/process here

Avatar Nutrition just release their own macro tracking app! YAY!

Here are the pros and cons of the Avatar Nutrition App-

Pros:
-Links directly to the Avatar Nutrition site so it has your personalized macro targets
-It has a subtraction system when you enter foods so you know how much fat, protein, carbs you have left for the day
-Visually appealing
-Scan ability
-Can enter your own food macros easily
-Can create favorites
-Can search for foods based on common foods or brands

Cons:
-Can take a little while to get used to if you were used to another tracking app

I will be weighing in with Avatar Nutrition on every Saturday. I also took before photos that I will share after this fat loss stage.

Here is what I have laid out for the coming week:

Breakfast: 1/2 c. oats, 1 T almond butter, 1 psyllium husk pancake (140 g egg whites, 5 g psyllium husk powder, 10 g coconut flour, 4-8 drops stevia, 1/2 tsp baking powder), & 1 tsp coconut oil

Lunch: 150 g zucchini, 120 g. Trader Joes cruciferous crunch mix, liquid aminos, 45 g jasmine rice (dry & I will cook it), 4 oz chicken breast, with dressing of mustard, liquid aminos, and stevia

Dinner: 200 g spaghetti squash, 8 pepperonis, 2 T tomato paste, 4 oz chicken breast, 1 T almond meal, 1 cup arugula, 1 T primal kitchen salad dressing

Snacks: 1 tomato basil rice cake, 1 dove dark chocolate, 8 oz homemade kombucha

Snack 2: 1 scoop protein powder, 8 oz unsweetened almond milk

TOTALS:120 g protein, 130 g carbs, 48g fat

P.S. I prep all of my food on Saturday/Sunday and will be eating basically the same meals every day of the week. 


Friday, February 9, 2018

{Instapot Almond Milk Yogurt}

Hello cupcakes!


I've tried made Instapot Coconut Yogurt, so I thought it would be fun to make Almond Milk yogurt. Here's how to do it-

In an Instapot, add homemade almond milk. I used about 4-6 cups. Place the Instapot on Saute. Stir the almond milk until it reaches 180 degrees. Remove the liner of the Instapot so it can cool. Add 2 T of honey or sweetener of choice & 1/2- 1 scoop of Vital Proteins Beef Gelatin. Stir until the ingredients are combined. Wait for the milk to cool to 100 degrees. Once cooled, stir in the powder of 2 probiotics (I used this brand) & 1 small container of plain almond milk yogurt (this is optional, you don't have to add it as long as you have the probiotics). Stir until combined. Add the top to the Instapot and place the Instapot on the Yogurt setting. I programmed mine for 9 hours. 

Once the 9 hours are over, add the yogurt to a container and refrigerate overnight or until the yogurt is set. 

For this yogurt bowl, I used homemade almond milk yogurt & 1 scoop of Quest Cinnamon Crunch protein powder. I stirred these together and topped it with pumpkin seeds, Anthony's Goods chia seeds, blueberries, and raspberries. 

I love adding my protein powder to my homemade yogurt because it keeps me full longer, adds more protein, and flavors the yogurt. 

HAPPY FRIDAY!

Later Taters

"It's a beautiful day, don't let it get away." 

Monday, February 5, 2018

{Dairy Free Pumpkin Bars}


Hello cupcakes!

I have a fun new recipe to share with you. What I like about this recipe, is you can adapt it to meet your dietary needs. You will see below, some of the ingredients are optional. I used them all, but you can omit for creating these bars if you are on Whole30, paleo, etc. 

RECIPE OPTION:

If you don't want a crust, skip to the filling recipe. If you want to add a crust to the pumpkin bars (like in the photo), mix these ingredients together in a bowl:

Crust
1/2 c Anthony's Goods Coconut Oil
1/2 c Anthony's Goods Coconut Sugar
1/2 c Anthony's Goods Brown Rice Flour
1/3 c old fashioned rolled oats
1/4 c homemade almond milk

Once the ingredients are combined, place/pat the dough onto the bottom of the sheet. Bake at 350 for 15-20 minutes. Remove from the oven and prepare the filling below:

Filling
1 can (13.5 oz) of full fat coconut milk
1 can (15 oz) of pumpkin puree 
2 ripe bananas
3 T almond butter (I used Trader Joe's brand)
4 eggs
1/2 c Anthony's Goods Collagen Powder
1/2 c Anthony's Goods Coconut Sugar *can omit*
1 tsp vanilla
1 tsp cinnamon
1 tsp baking powder

(If you didn't make a crust, preheat oven to 350 degrees & grease a 13X9 inch pan) Add all ingredients to a big bowl. Mix together  with an immersion blender. If you don't have one, I would recommend a food processor. Once combined, scoop the batter into the greased pan and bake at 350 degrees for 30 minutes. Serve warm or chilled in the refrigerator. Store in the refrigerator if you have extras. 

Later Taters

"It's a beautiful day, don't let it get away." 

{Almond Dip/Spread}

Hello cupcakes, 

While my fiancé and I were in San Diego, our friends introduced us to Bitchin' Sauce. I knew I had to try to make my own!


Here's how I did it:

Soak 1- 1 1/2 cups of raw almonds in filtered water for 12-24 hours

Drain the almonds and add to a food processor. Process the almonds until ground. Next add: 2 T Primal Kitchen Extra Virgin Avocado Oil, 1/3 of a lemon juiced, 1/4 tsp onion powder, 1/4 tsp garlic powder, 1/2 tsp Tajin seasoning (or chili powder), 2 T nutritional yeast, 1 T Liquid Aminos, sprinkle of pink Himalayan salt, 1/4 c +1 T water. Blend everything until smooth. 


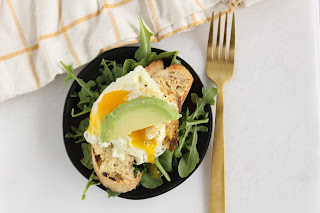
I made this BOMB breakfast sandwich using the Almond Dip. It's super easy: I spread the Almond Dip on a piece of REAL sourdough (read Lil Sipper's Blog Post) and topped it with an over easy egg & avocado. Under the toast, I put the arugula mixed with olive oil. 

I also took this dip to a friend's dinner and we dipped pretzels and wheat thins in the dip. 

Later Taters

"It's a beautiful day, don't let it get away."


Sunday, February 4, 2018

{Vegan Chocolate Chip Cookies}

{Vegan Chocolate Chip Cookies}


Hello cupcakes,

I made some vegan chocolate chip cookies for an office carry-in and they turned out pretty well. The hardest part when baking vegan cookies is finding a good egg substitute to keep everything together. Also, finding an egg substitute that keeps the same  texture of regular baked goods. You can use applesauce and bananas as an egg substitute, but that makes the cookies more cake-y. In this recipe I used a combination of water, oil, and baking powder to substitute and egg. 

Here's the recipe:

Mix together these ingredients for an egg replacement:2T water, 1 t @primalkitchenfoods extra virgin avocado oil, 2 t baking powder
Now add egg replacement and these ingredients to a big bowl-1 t vanilla Sprinkle salt1/2 c PB1/2 c @anthonysgoods coconut oil1 c. @anthonysgoods Coconut sugar 1 c @anthonysgoods peanut flour Stir the ingredients together until it forms into a dough. Next add 1/2 bag @traderjoes semi sweet chocolate chips. Stir to incorporate. Roll the dough into balls and place in a cookie sheet. Bake at350 degrees for 10 minutes. Remove from the oven and let the cookies stand for about 10 minutes. Place the cookie sheet in the refrigerator and let the cookies come to harden (or else they will crumble apart). Once chilled, remove from pan and store in an airtight container! 

Happy Baking!

Later Taters

"It's a beautiful day, don't let it get away."


Thursday, February 1, 2018

{Instapot Egg Roll in a Bowl}

Hello cupcakes!

I am engaged and I joined BodyBuilding.com's 12 week challenge. I took my before photos and I will take photos after the 12 weeks. I want to share some of my recipes with you along the way, so that you can see first hand my plan!

This is week 1 of the challenge for myself and this is the meal I prepped for my lunches:

{Instapot Egg Roll in a Bowl}

Ingredients:
2 lbs of lean ground beef
2 T. Primal Kitchen Extra Virgin Avocado Oil
1/4 c. reduced sodium soy sauce or coconut aminos
1/4 c. sesame oil
optional * 5 drops of stevia *
1 cup of reduced sodium beef broth
Salt/pepper
1 tsp garlic powder
sprinkle of red pepper flakes
2 T rice wine vinegar
1 1/2 bags of coleslaw mix (cabbage, carrots, red cabbage)
1/2 pkg. green onions, sliced
1 pkg. of mushrooms, sliced
Optional* cooked rice or cauliflower rice*


Directions:
In an Instapot, add Avocado Oil & ground beef. Use the sauté setting to cook the ground beef. Once browned and cooked most of the way, add sesame oil, soy sauce, beef broth, garlic powder, salt/pepper, red pepper flakes, and rice wine vinegar. Stir to combine. Add 1/2 of the coleslaw mix and green onions. If this does not fit, omit more of the coleslaw and save this for the second pot.

Place the lid on the Instapot and make sure it's sealed. Cook on high pressure for 13 minutes. Let the pressure release naturally. Once released, scoop the meat and coleslaw out of the Instapot and into a different bowl. Leave the juices in the Instapot and add the rest of the coleslaw and mushrooms. Return the lid, and cook on high pressure for 8 minutes. Let the pressure release naturally. Add the new Instapot mixture to the previous mixture and stir to combine.

Serve the mixture by itself, with rice, or with cauliflower rice. This is a super low carb meal that will fill you up!

If you do not have an Instapot, don't worry... you can also make this on the stove top it will just change the cooking times. Sauté everything on the stove top in a big pot!

This batch made enough for 5 work lunches for myself and 3-4 lunches for my fiancé.

Later Taters
"It's a beautiful day, don't let it get away."

Related Posts Plugin for WordPress, Blogger...